

When you need to rebuild an Exchange Server, it would mean that a catastrophic failure or any other major issue has occurred. In this article, we will be discussing the reasons why you need to rebuild an Exchange Server and the stepwise process involved in rebuilding an Exchange Server. In addition, we will be discussing ways to recover data in case the databases or transaction logs get corrupted.
Why you need to rebuild the Exchange Server?
There could be many reasons why you would need to rebuild the Exchange Server. Let’s list a few common reasons:
- System failure can happen due to hardware malfunction, sudden loss of power, critical software errors in Exchange Server or the operating system, and other reasons. This can also cause corruption in the databases or transaction logs.
- Disaster Recovery from a catastrophic failure, like fire, flood, or other natural disasters, and cyber-attacks.
- Human Errors, such as misconfiguration of Exchange Server or introduction of a third-party software which is either not configured well or not compatible with the version of the Exchange Server installed.
This means that either the installation of the Exchange Server is unusable or the operating system is not booting and there is no way to resolve the problem.
Stepwise Process to Rebuild the Exchange Server
Before proceeding, you must make sure that the below items are in hand and updated:
- Full documentation of the server hardware, IP addresses, network configuration, and storage structure
- Exchange Server installation media
- Operating system installation media
- Copy of the certificates or access to the Certificate Authority
You must also make sure that the Active Directory is still intact and accessible as this is a crucial part of rebuilding of the Exchange Server.
Step 1: Setup the Machine with Same Configuration
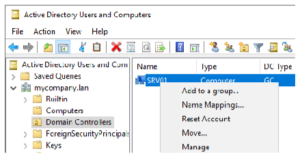
In the process of rebuilding an Exchange Server, the first step is to build the machine or virtual machine with the same or better hardware specifications. Since all the configuration of the Exchange Server is kept in the Active Directory Schema, the server must have the same computer name and IP address. Before starting the installation, you must reset the computer account from the Active Directory.
For this, open the Active Directory Users & Computers from the Active Directory Server, find the computer name of the server to be rebuilt, right click on the computer name, and click on Reset Account.
Once the installation of the server is complete, joined to the domain, and all the updates are completed, you can go ahead and insert/mount the Exchange Server installation media.
Note: The storage and drive letters must match the previous installation before proceeding.
Step 2: Install Exchange Server in Recovery Mode
The next step is the installation of Exchange Server in recovery mode. Before you proceed with this, you must note that the following items will not be retrieved and must be configured manually afterwards. Here is where you would refer the documentation or change management request information.
- Certificates
- Custom Send/Receive connectors
Once the media is inserted, open a command prompt as Administrator and type the following command from the media directory:
setup.exe /m:recoverserver
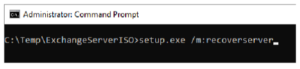
The process of installation will take around 45 minutes. This depends on the server’s performance. Once complete, the installation will pull the failed server configuration from the Active Directory Schema. Once completed, you will be able to access the Exchange Admin Center (EAC) and Exchange Management Shell (EMS) to install the custom certificate and setup the custom connectors.
Step 3: Recover the Data and Restore the Services
The next step is to recover the data and restore the access and services. This is a challenging part. Since the server has failed or didn’t shutdown the databases properly, there might be chances that the transaction logs and databases get corrupted. If not, you still cannot just mount the databases and work.
To recover the data, you can use the native tools in Exchange Server or third-party Exchange recovery tools.
Using the Native Tools
You can use the native tools, such as ESEUtil, for database recovery. First, you need to run the Soft Recovery process. This can be done by using the following ESEUtil command:
eseutil /r E01 /l “path-to-log-files” /d “path-to-database”
This will run a smooth recovery. When completed, you can run the below command to confirm that the state of database is Clean Shutdown.
eseutil /mh “path-to-database.edb”
If the database state is still showing as Dirty Shutdown, this means that there is high corruption in database. In such a case, you can run the ESEUtil to perform Hard Recovery, but this comes with a big red notice. In addition, there is no guarantee that the database will become healthy. Moreover, during the execution, you would need free storage space of approximately the same size as the database. You must also consider the fact that the hard recovery simply purges anything which might be corrupted and result in data loss. It must be used as a last resort.
To perform Hard Recovery, run the below command:
eseutil /p “path-to-database.edb”
This process will take a considerable amount of time depending on the size and performance of the server. Once the operation is done, you must perform the following:
- Defragmentation of the database
- Integrity check of the database
For defragmentation, run with the following command:
eseutil /d “path-to-database.edb”
After this is complete, the database integrity check can be executed by running the below command:
eseutil /mh “path-to-database.edb”
Once the operations are complete and the databases are shown as healthy shutdown, you can mount the database.
Using Third-Party Exchange Recovery Tools
As you have seen above, the recovery process using native tools can take a considerate amount of time and resources while the success rate is not guaranteed. With Exchange recovery tool, such as Stellar Repair for Exchange, you can easily overcome these challenges while ensuring smoother and faster recovery of data, with no data loss.
With Stellar Repair for Exchange, you can open multiple EDB databases, from any version of Exchange Server, of any size, and in any state. Once the quick scan or deep scan is complete, you are presented with the entire structure of the databases. You can granularly export user mailboxes, user archives, shared mailboxes, disabled mailboxes, and public folders, to PST and other file formats. In this case, you can export the EDB data directly to a live Exchange Server database with automatic mailbox matching, parallel export, and priority exports. You can also use the tool to export directly to Microsoft 365 tenant.
Conclusion
You need to rebuild the Exchange Server after a system failure due to hardware upgrade, failed update, malware attack, or loss of power. However, rebuilding an Exchange Server is a challenging task, especially when it comes to recovering the data without any loss and in the minimum amount of time. With the right guidance and the right tools, the task can be transformed into a manageable and systematic process.
Related News: